Showing posts with label Email Template. Show all posts

Thursday, June 21, 2012

To send Email from Apex using email Template

To use an Email Template from Apex Class in order to send an email:
In order to send an email from apex class, you can use any of the below messaging objects.
Single Email Messaging :
Instantiates the object to send single email message.
Ex: To send single email to a selected Contact.
public void SendEmail()
{
contact con=[Select id from contact limit 1];
EmailTemplate et=[Select id from EmailTemplate where name=:'EmailTemplatename'];
Messaging.SingleEmailMessage mail = new Messaging.SingleEmailMessage();
mail.setTargetObjectId(con.Id);
mail.setSenderDisplayName('Charan Tej');
mail.setTemplateId(et.id);
Messaging.sendEmail(new Messaging.SingleEmailMessage[] { mail });
}
For other object methods of Single Email Messaging, Click Here
Note: Do remember that we can send only 10 emails in method invocation of Apex class using SingleEmailMessage.
Mass Email Messaging:

Instantiates the object to send mass email message.
Ex: To send mass email to a Contacts.

public void SendEmail()
{
List<contact> lstcon=[Select id from contact limit 200];
List<Id> lstids= new List<Id>();
for(Contact c:lstcon){
lstids.add(c.id);
}
EmailTemplate et=[Select id from EmailTemplate where name=:'EmailTemplatename'];
Messaging.MassEmailMessage mail = new Messaging.MassEmailMessage();
mail.setTargetObjectIds(lstIds);
mail.setSenderDisplayName('Charan Tej');
mail.setTemplateId(et.id);
Messaging.sendEmail(new Messaging.MassEmailMessage[] { mail });
}

For other object methods of Mass Email Messaging, Click Here

Friday, June 1, 2012

Email Services


Email services:
       Email services are automated processes that use the Apex classes to process the contents, headers, and attachments of inbound email.
For example, you can create an email service that automatically creates contact records based on contact information in messages. Each email service has one or more email service addresses that can receive messages for processing.
To use the email services, click Your Name  Setup  Develop  Email Services.
Given below email service class inserts Contact which is declare in setting of Email Services.

Class for Email Services:
global class ProcessJobApplicantEmail implements Messaging.InboundEmailHandler {

  global Messaging.InboundEmailResult handleInboundEmail(Messaging.InboundEmail email,
    Messaging.InboundEnvelope envelope) {

    Messaging.InboundEmailResult result = new Messaging.InboundEmailresult();

    Contact contact = new Contact();
    contact.FirstName = email.fromname.substring(0,email.fromname.indexOf(' '));
    contact.LastName = email.fromname.substring(email.fromname.indexOf(' '));
    contact.Email = envelope.fromAddress;
    insert contact;

    System.debug('====> Created contact '+contact.Id);

    if (email.binaryAttachments != null && email.binaryAttachments.size() > 0) {
      for (integer i = 0 ; i < email.binaryAttachments.size() ; i++) {
        Attachment attachment = new Attachment();
        // attach to the newly created contact record
        attachment.ParentId = contact.Id;
        attachment.Name = email.binaryAttachments[i].filename;
        attachment.Body = email.binaryAttachments[i].body;
        insert attachment;
      }
    }
     return result;
  }
}

Test Class for Email Service:
@isTest
private class EmailTest{
static testMethod void testMe() {

  // create a new email and envelope object
  Messaging.InboundEmail email = new Messaging.InboundEmail() ;
  Messaging.InboundEnvelope env = new Messaging.InboundEnvelope();

  // setup the data for the email
  email.subject = 'Test Job Applicant';
  email.fromname = 'FirstName1 LastName1';
  env.fromAddress = 'raees.sabir@accenture.com';

  // add an attachment
  Messaging.InboundEmail.BinaryAttachment attachment = new Messaging.InboundEmail.BinaryAttachment();
  attachment.body = blob.valueOf('my attachment text');
  attachment.fileName = 'textfile.txt';
  attachment.mimeTypeSubType = 'text/plain';

  email.binaryAttachments =
    new Messaging.inboundEmail.BinaryAttachment[] { attachment };

  // call the email service class and test it with the data in the testMethod
  ProcessJobApplicantEmail emailProcess = new ProcessJobApplicantEmail();
  emailProcess.handleInboundEmail(email, env);

  // query for the contact the email service created
  Contact contact = [select id, firstName, lastName, email from contact
    where firstName = 'FirstName1' and lastName = 'LastName1'];

  System.assertEquals(contact.firstName,'FirstName1');
  System.assertEquals(contact.lastName,'LastName1');
  System.assertEquals(contact.email,'raees.sabir@accenture.com');

  // find the attachment
  Attachment a = [select name from attachment where parentId = :contact.id];

  System.assertEquals(a.name,'textfile.txt');
 }
}

Wednesday, May 23, 2012

Visualforce Email Template 3

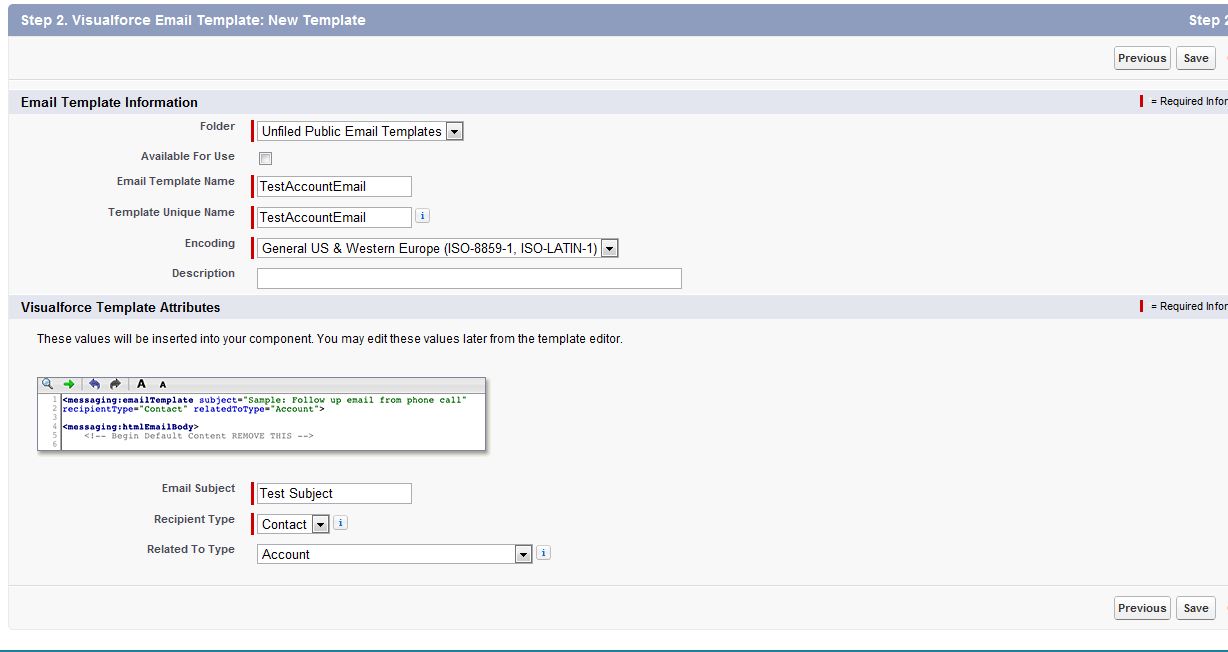
Create a Visualforce Email template by navigating to
Setup --> Communication Templates --> Email Templates --> New TemplateSelect "Visualforce" in the first step...

Give a tilte,name,Subject for your template. Next select the Receipent type and Related to (Related to denotes the object from which you would want data to be displayed in your Email).. Click "Save".... Remember to check "Available for use" to make your email template available for use in Workflow email alerts and whereever it may be useful....
You will now see the template detail Page... In the "Email template" section click on "Edit Template" button... This will take you to a Visualforce Page editor...

You can also click on "Attach file" button in "Standard Attachments" section to attach a file from your desktop to your email..

Below is a small piece of code... You will have to put this code in the editor that appears when you click on "Edit template" button
Note: I have used "htmlEmailBody" for including HTML tags in my template.. Also, since the "Relatedto" is "Account" i am displaying Account information in my template..
  <messaging:emailTemplate subject="Testing Visualforce Email Template" recipientType="User" relatedToType="Account">  <messaging:HtmlEmailBody >  Account Name : {!Relatedto.Name} <br/>  Account Description : {!Relatedto.Description} <br/>  </messaging:htmlEmailBody>  </messaging:emailTemplate>  

What you Can...
With Visualforce email templates you can display any data from the related object in any format you wish.. If Relatedtotype =Account you can display any field of the Account and you can also display the related lists of Account .. For ex you can create a datatable with the value="{!Relatedto.Contacts}"... Similarly you can display other related lists...

What you Cannot...
You cannot use the <apex:page> tag inside your Email template.. Having said this you cannot use pageblock, pageblocksection or any other tag which is a child of the <apex:page> tag.. You can use outputfield,outputtext,datatable etc.. Do not attempt too much of styling and formatting for your email templates unless it is extremely necessary because you would'nt know how your email would be rendered by different providers.. Always use simple and standard formatting so that your email displays uniformly across all providers...

Creating Email Templates and Automatically Sending Emails


Solution

  1. Create an appropriate email template through the email template wizard. Salesforce.com supports multiple email template types. This examples assumes you are using a Visualforce email template. To create a Visualforce email template, you must have the "Customize Application" permission enabled.
  2. Send an automatic email response to the job applicant's incoming email using the Messaging.sendEmail static method to process outbound email messages.
    First, create a Visualforce email template:
    1. Click Setup | Email | My Templates. If you have permission to edit public templates, click Setup | Communication Templates | Email Templates.
    2. Click New Template.
    3. Choose Visualforce and click Next.
    4. Choose a folder in which to store the template.
    5. Select the Available For Use checkbox if you would like this template offered to users when sending an email.
    6. Enter an Email Template Name.
    7. If necessary, change the Template Unique Label.
    8. Select an Encoding setting to determine the character set for the template.
    9. Enter a Description of the template. Both template name and description are for your internal use only.
    10. Enter the subject line for your template in Email Subject.
    11. In the Recipient Type drop-down list, select the type of recipient that will receive the email template.
    12. Optionally, in the Related To Type drop-down list, select the object from which the template will retrieve merge field data.
    13. Click Save.
    14. Click Edit Template.
    15. Enter markup text for your Visualforce email template.
    16. Click Save to save your changes and view the details of the template, or click Quick Save to save your changes and continue editing your template. Your Visualforce markup must be valid before you can save your template.
      The maximum size of a Visualforce email template cannot exceed 1 MB.
    This sample Visualforce email template creates an interview invitation:
    <messaging:emailTemplate subject="Received your resume"       recipientType="Contact" relatedToType="Job_Application__c">    <messaging:plainTextEmailBody >  Dear {!relatedTo.Candidate__r.First_Name__c}            {!relatedTo.Candidate__r.Last_Name__c}    Thank you for your interest in the position           {!relatedto.Position__r.name}    We would like to invite you for an interview.   Please respond to the attached invitation.    Regards,  Company  </messaging:plainTextEmailBody>      <messaging:attachment filename="meeting.ics"           renderAs="text/calendar; charset=UTF-8; method=REQUEST">  BEGIN:VCALENDAR  METHOD:REQUEST  BEGIN:VTIMEZONE  TZID:(GMT-08.00) Pacific Time (US and Canada)  BEGIN:STANDARD  DTSTART:16010101T020000  TZOFFSETFROM:-0700  TZOFFSETTO:-0800  RRULE:FREQ=YEARLY;WKST=MO;INTERVAL=1;BYMONTH=11;BYDAY=1SU  END:STANDARD  BEGIN:DAYLIGHT  DTSTART:16010101T020000  TZOFFSETFROM:-0800  TZOFFSETTO:-0700  RRULE:FREQ=YEARLY;WKST=MO;INTERVAL=1;BYMONTH=3;BYDAY=2SU  END:DAYLIGHT  END:VTIMEZONE  BEGIN:VEVENT  DTSTAMP:20090921T202219Z  DTSTART;TZID="(GMT-08.00) Pacific Time           (US and Canada)":20090923T140000  SUMMARY:Invitation: Interview Schedule @ Wed Sep 23 2pm - 4pm   ATTENDEE;ROLE=REQ-PARTICIPANT;PARTSTAT=NEEDS-ACTION;RSVP=TRUE;          CN="{!recipient.name}":MAILTO:{!recipient.email}  ORGANIZER;CN="John.Smith":MAILTO:recruiter@company.com  LOCATION:Hawaii   DTEND;TZID="(GMT-08.00) Pacific Time           (US and Canada)":20090923T160000  DESCRIPTION: You are invited to an inverview          \NInterview Schedule          \NWed Sep 23 2pm - 4pm           (Timezone: Pacific Time) \NCalendar: John Smith           \N\NOwner/Creator: recruiter@company.com             \NYou will be meeting with these people:          CEO Bill Jones,           Office Manager Jane Jones  \N  SEQUENCE:0  PRIORITY:5  STATUS:CONFIRMED  END:VEVENT  END:VCALENDAR    </messaging:attachment>    </messaging:emailTemplate>  
    Then, send an automatic email response to the job applicant's incoming email. This example uses a Visualforce email template:

      // In a separate class so that it can be used elsewhere  Global class emailHelper {    public static void sendEmail(ID recipient, ID candidate) {      //New instance of a single email message   Messaging.SingleEmailMessage mail =               new Messaging.SingleEmailMessage();     // Who you are sending the email to     mail.setTargetObjectId(recipient);       // The email template ID used for the email     mail.setTemplateId('00X30000001GLJj');                 mail.setWhatId(candidate);         mail.setBccSender(false);     mail.setUseSignature(false);     mail.setReplyTo('recruiting@acme.com');     mail.setSenderDisplayName('HR Recruiting');     mail.setSaveAsActivity(false);       Messaging.sendEmail(new Messaging.SingleEmailMessage[] { mail });        }    }    

    Source : http://developer.force.com/cookbook/recipe/creating-email-templates-and-automatically-sending-emails
    https://login.salesforce.com/help/doc/en/creating_visualforce_email_templates.htm

    Visual Force Email Templates 2

    Using custom components makes lots of stuff possible. Here's an example of a year-end giving thank you email:
    screenshot
    This shows all gifts for 2008 and attaches a PDF of the giving history as well. Note that this is done just by connecting to the Contact, so this would work in the Salesforce.com mass mail interface.
    Update: You cannot use vf templates in mass email or in the apex outboundemail method in Winter '09. Maybe next release…
    Also note that it's an ugly HTML email just because I'm not a designer. You can make this as professional as you're willing to make it.
    Here's the relevant code:
    The VisualForce Email Template
    <messaging:emailTemplate subject="Thank you for your Support!" recipientType="Contact" >      <messaging:htmlEmailBody >          <html>          <body>              <p>Hello {!recipient.Household_Greeting__c}--</p>              <p>Thank you so much for you giving this year. Every gift helps us make a difference in our envrionment...</p>              <c:thisYearGivingTable ContactId="{!recipient.Id}"/>              <br/><br/>              We look forward to seeing you in 2009!              <br/><br/>              Best,              Steve                </body>          </html>      </messaging:htmlEmailBody>      <messaging:attachment renderas="pdf" filename="{!recipient.Household_Greeting__c}_2008_Giving.pdf">  <html>  <body>  <h3>2008 Giving History for {!recipient.Household_Greeting__c}</h3>  <c:thisYearGivingTable ContactId="{!recipient.Id}"/>    </body>  </html>  </messaging:attachment>  </messaging:emailTemplate>  
    The VisualForce Component that is included in the Email Template:
    <apex:component controller="thisYearGivingTableController" access="global">   <apex:attribute name="ContactId" description="This is the Contact Id." type="Id" assignTo="{!thisContactId}"/>   <table border="1">    <tr>        <td><apex:outputText value="Date"/></td>        <td><apex:outputText value="Amount"/></td>        <td><apex:outputText value="Check Number"/></td>        <td><apex:outputText value="Check Date"/></td>    </tr>    <apex:repeat value="{!thisYearOpps}" var="opp" id="theRepeat">    <tr>        <td><apex:outputField value="{!opp.CloseDate}"/></td>        <td><apex:outputField value="{!opp.Amount}"/></td>        <td><apex:outputField value="{!opp.Check_Number__c}"/></td>        <td><apex:outputField value="{!opp.Check_Date__c}"/></td>      </tr>   </apex:repeat>   </table>  </apex:component>  
     
    The Apex Controller that powers the logic for the VisualForce Component:

    public class thisYearGivingTableController {   //capture the contact id   public Id thisContactId {get;set;}   //a list to hold this year's gifts   public List<Opportunity> thisYearOpps = new List<Opportunity>();   //get the gifts into the list   public List<Opportunity> getThisYearOpps() {    //criteria for opps    thisYearOpps = [SELECT Id, Amount,CloseDate, Check_Date__c, Check_Number__c FROM Opportunity     WHERE IsWon=true AND Year__c=:String.valueOf(system.Today().Year()) AND Id IN     (SELECT OpportunityId FROM OpportunityContactRole WHERE ContactId = :thisContactId AND Role='Individual Donor')     ORDER BY CloseDate];    return thisYearOpps;   }  }  

    VisualForce Email Template

    Three tags to create VisualForce email template
    1) <messaging:emailTemplate> – in which you specify recipient type, relatedToType, subject and email address that they can reply back to.
    2) <messaging:htmlEmailBody> – in which you define the html content you want to show in your Email.
    3) <messaging:plainTextEmailBody> – in which you include the text version of your Email.
    Let me show you a simple example of how to create a VisualForce email template. We are going to create an email template which sends email about contacts that are related to an account.
    The first step is to create an email template by going to Setup -> Administration Setup -> Communication Templates -> Email Templates -> New Template


    <messaging:emailTemplate subject="Contact Information for Account: {!relatedTo.name}" recipientType="Contact" relatedToType="Account" replyTo="sivateja.s@gmail.com">
    <messaging:htmlEmailBody >
    <html>
    <body>
    <p> Dear {!recipient.name},</p>
    <p> Below is the list of contacts related to your account: {!relatedTo.name}.</p>
    <table border="0">
    <tr>
    <th> Action </th>
    <th> Contact Name </th>
    <th> Contact Email </th>
    </tr>
    <apex:repeat var="con" value="{!relatedTo.Contacts}">
    <tr>
    <td> <a href="na7.salesforce.com/{con.id}"> View </a>
    <a href="na7.salesforce.com/{con.id}/e"> Edit </a> </td>
    <td> {!con.Name} </td>
    <td> {!con.Email} </td>
    </tr>
    </apex:repeat>
    </table>
    </body>
    </html>
    </messaging:htmlEmailBody>
    <messaging:plainTextEmailBody >
    Dear {!recipient.name},

    Below is the list of Contacts related to Account: {!relatedTo.name}.

    [Contact Name] - [Contact Email]
    <apex:repeat var="cont" value="{!relatedTo.Contacts">
    [cont.Name]  -  [cont.Email]
    </apex:repeat>

    For more detailed information login to http://www.salesforce.com
    </messaging:plainTextEmailBody>
    </messaging:emailTemplate>
     
    Last step is to test and verify merge fields. Click Send Test and Verify Merge Fields button to verify merge fields.